Saturday, April 14, 2018

The First Modification But Not The Last

As promised I have a super video of my new wood splitter taking on some real good sized oak logs and a nice little commentary on how well it works.  As well as the splitter working I have the awesome modification I added to my Supersplit to show off.   Today I am going to end with the video but start with some pictures of the splitter and the Log lift I added to it to make my job easier. 
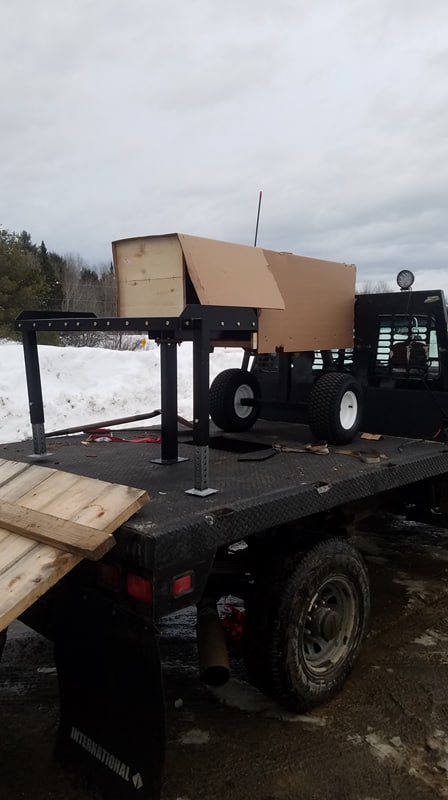
Here it is! As far as I am concerned probably one of the best attachments I could possibly add to this already amazing machine.  It is made by a different company but it bolted on with just a few small holes and some slight modification to the work table. 
 
On the left is the worktable that had to be removed from the machine to drill holes in the I-Beam and to cut a few small notches in the table.  At the top of the table I had to take just under half an inch off from the table and then a two inch chunk out of the that you can see.  In hindsight that hole could have been slightly smaller but it doesn't hurt the operation at all.  The picture on the right starring my favorite Honda 250sx three wheeler is showing off how wide the log lift makes the splitter for transport.  The lift is also removable with three super easy pins. 

When first fitting it on Allyssia had to come out to the shop and help remove the work table.  It is a fairly heavy chunk of steel and when removing it you also remove the bolts holding the leg onto the splitter. 


Now for what I promised a video of the splitter making light work of some larger logs and the log lift taking the hard work out of getting those logs onto the splitter. 
                                                 Modified Supersplit with Log Lift
I hope you all enjoyed the video.  My video taking skills are getting better and my GoPro makes it so easy to do.  The editing once I have them on the computer is another story but I get it there so I must be doing alright.  As always check back often and with spring coming there will be lots of new projects. 

Wednesday, April 11, 2018

And a Few Days Later, Unloaded at Home

Sunday we made it home from Pennsylvania late in the afternoon.  Cricket was just overjoyed to see us and almost couldn't contain her excitement (and neither could Allyssia).  This is only her second time being away from us for more than the day and the first time since being in the new house. 
She even came to help unload and welcome the new tractor.  I was in a bit of a predicament unloading the Quadractor as I don't have a big enough tractor to lift it up like we did when loading it.  I decided to unload it using a chain fall from the rafters of Allyssia's indoor arena.


The Quadractor came home with the side covers strapped on but they had to be removed for the unloading process.  With the side and front panels off I was able to use some three inch tow straps to lift it.  Now the rigging was not amazing but as you can see it held up and lifted the Quadractor very evenly up.
                                                 Success Unloading the New Quadractor
After getting it out of the truck the front tires had to go back on and having it slung from the ceiling was the perfect time to do it.  I was able to work at an ideal height. 


Now some of you might notice that I tied a knot in the straps to make them shorter so that my chain fall would lift it high enough. If your not careful this can ruin your strap and make that know near impossible to get out.  What I do in cases like this is place a small chunk of dowel into the center of the knot when tightening it up and then it can be pulled out after dong what you need to do. This leaves you with some slack to loosen the rest of the knot. I probably wouldn't suggest this when picking up real heavy items but the Quadractor weighs less than 500 pounds so it didn't bother the straps. 


Side note here, It looks like Allyssia's indoor is full of my junk but that was all temporary while we were gone to keep it all out of the snow and under cover. 


Another thing to note is that the straps were held under the machine on their correct ends so that they could not slide to the center and let the Quadractor flip.  Again I must say just how surprised I am that it unloaded as easily as it did.  I was worried that it was going to be a production and was thinking about taking Grampa up on his offer to bring it there and unload it from the truck with his tractor and set it on the trailer. 


When it was finally unloaded it needed to be removed from the indoor and what better tool to use to move a Quadractor, than a Quadractor!  With the tow truck boom on my running tractor it was a cinch to pull the new Quadractor over in front of the garage so that I can work on it. 
And finally the three point hitch.  This was a big part of why I wanted this tractor is for the hitch.  I will end up putting that on my running machine.  I might even attempt to turn this Quadractor into a runable machine but that is a decision for another day,  As for me I am just happy to have it home and have a second Quadractor.  Stay tuned later this week when I have my wood splitter review and I split some real logs with it to show off my modifications to it.  Stay tuned and check back often!

Saturday, April 7, 2018

On the Road For Rusty Gold

With over a month in planning - on Friday, Allyssia and I started out on a long distance tractor acquisition trip.  It started when I was surfing Craigslist and came across a tractor that I just had to have.  The biggest problem with this tractor was it's location.  At nine hours away in Jersey Shore, Pennsylvania I had a bit of a predicament. 
As you can see it is a heck of a trip down here but your asking what could possibly be worth driving that far to get?  Well, it is nothing short of a Quadractor!!


This Quadractor was used quite hard but it is still a great find.  The gentleman I bought it from was a dealer back when Quadractor was first made.  He used this machine for years on his own woodlot hauling firewood. 
The best part of this particular Quadractor is the factory three point hitch and spare parts.  When I showed up the owner of the Quadractor had the tires inflated after twenty years of sitting and had it hooked up to his tractor like shown to the left. 
A little side note here, if you all couldn't tell the truck in the picture is not my truck, but Grampa's truck.  His truck is better on fuel mileage a lot more comfortable for long trips, plus the cruise control works.  So thankfully Grampa let me borrow his truck and all his ratchet straps for the trip. 


What you see here is just the bare tractor but he did have the two side panels two front hoods and a tailgate as well as chains for all four tires. 
We tried to fit the tractor in the truck bed but even though I measured my tractor at home this one would not fit.  We started out by taking just the ditch side front tire off to get it to fit but I was worried about tearing the bed liner up because it was still tight so we removed the drivers side front tire as well.


After removing both front tires it became a problem rolling it forward in the truck so we put some boards under the hubs and up over the wheel wells for the hubs to slide up.  Bill then picked the rear of the Quadractor by the three point hitch and slowly pushed it forward. 


Luckily the Quadractor was built to be a light machine so it was easy to pick up and move around the bed of the truck.  We left the rear wheels on and left them setting on the tailgate and strapped it like that.  I also put a load lock behind the front two axle mechanisms.  After it was loaded I put the side panels on and strapped them to the machine.  Tomorrow morning I will post a short update with some more pictures of the 3 point hitch and the tractor completely loaded and strapped.  We still have a five hour drive ahead of us from Coxsackie, New York.  I am very excited to get the three point hitch on my Quadractor and get this one unloaded and assess it a little more.

Wednesday, April 4, 2018

Still Working at it Slowly

Slowly we are making progress around the farm. With the snow melting and the days getting warmer and staying light later I am able to work on all of the things more.  I have been cleaning the indoor out so that Allyssia can start riding and teaching lessons.  She has gotten Gina out riding in the arena a couple times since. 
Gina really likes the indoor and it keeps them both out of the wind!
I hauled two full loads of scrap wood to the dump out of the indoor and kept a huge pile of wood for some of my own projects.  There was also shelving that went into my garage and lots and lots of chicken wire that I relocated.

 We still have some leveling to do with a bigger tractor but I was able to do quite a bit with just my little skid steer.  We also got a spike drag to dig up the arena footing a little bit.  The drag was from my Grampa and it works excellent.  It is smaller than my homemade drag which we will see in a later post but for the indoor it works great. 


 The warm weather is most definitely a leading factor in all the work that is getting done here at the farm.  Allyssia is out riding again and we got out fence posts home to start fencing soon. 


It looks like a huge pile of fence posts because it is a huge pile of fence posts. There are two hundred and fifty two posts in all and once the ground is thawed - all of them will be in the ground with electric fence wire on it. 


Lastly for today is a quick video of Allyssia and Gina on their first ride down Webster road together.  The road is bumpy enough that people go slow and don't bother the horses when they go by. 


In the coming weeks there are a few updates that you can expect around here! 
Number one I have already modified my wood splitter for the better and I will be doing a YouTube review on it.
Two, Allyssia and I are going on a trip this weekend chasing after some rusty gold (I wonder what it is).
Three, the start of the mudroom project, the windows came in so now I have to start working on it.  Four, Fencing when the frost is out of the ground.
Lastly my mobile chicken coop and some more tractors will be moving north to their new home.  So stay tuned and check back often to see whats going on here at the Rusty Gold Farm.

Friday, March 30, 2018

A New Friend at the Farm

So since we moved in to the farm we have had a little bit of a rat problem in the barn. We have been setting rat traps and even set a small have a heart trap to try to catch the little buggers.  I have only caught one rat as they have so much other food they don't feel like bothering my traps.  Well this past week we have been finding dismembered rats all over the hay loft and throughout the barn so I set the large have-a-heart trap to try to find out what has been eating the rats.  Finally Wednesday we caught our suspect! 
Now in this picture he doesn't look too happy, and that's because he isn't happy at all.  We weren't sure what to do with him so we called the Franklin County Animal Shelter (check them and all the great things they do out here). https://www.fcanimalshelter.org/ and they suggested bringing him in for their feral cat program.  What they do to help keep the cat population down is a  Trap- Neuter-Release program - they spay and give shots to these feral cats for free and then send them back to their barn homes.  They even let us use their carry crate to bring our new friend home in. I picked him up today and brought him home.  I placed him in the hay loft with the cage closed for the afternoon and evening and made him a cardboard box and blanket home.  This evening at night check Allyssia and I brought him some food and water outside of his cage and opened it up for him to be free. 
He is looking a little bit happier and he even let me pat him a bit without hissing.  Now that he has a home he will hopefully stay around the farm . He needed a name so Allyssia and I decided on Simon.  He is not going to be a house cat but hopefully he will become a friendly barn cat and become a common sight around here.

Sunday, March 18, 2018

Finally a New Wood Splitter

So a few weeks ago I bit the bullet and ordered a Supersplit band wood splitter.  Now I am no stranger to the Supersplit brand, or the kinetic force wood splitters so this was not anything new to me.  I bought my first Supersplit wood splitter a few years back, used. The first one I bought was nothing fancy and it was far from new. 
As you can see my first one was an electric model with a 3/4 hp 120v motor on it.  The original fiberglass cover for the flywheel was all but useless so I made a new one for it out of sheet metal.  It also sits a little lower in the front so it had to be sitting up on a banking or screwed to a few 2x4's   This particular splitter has served me well over the last few years but as I do 10 cord of wood every year and a lot of that wood is quite large, it was starting to get worn out. Not to mention the fact that it is over 30 years old. 
For such a small splitter it would and still will split some pretty amazing logs.  (this picture was taken before I got my LogOx as you can see I am using just a birch hook)  In this picture you can also see the pair of vice grips that I had to use to engage the splitter.

Now on to the New splitter!!  I ordered a supersplit HD model with the gas engine, large work table and tow hitch.  I ordered it direct from the owner of the company and was even lucky enough to call and talk to the owner about my old splitter and the new one.  The splitter is made right in Massachusetts, USA. It was shipped up via Ross trucking and I had to have it delivered to Memco, Inc - the local plumbing supply company.  Tony the owner of Memco was able to load it with his fork lift but my unloading was a little more primitive. 


It does look like it was a bit dangerous unloading but I did plan it that way, having the sideboards placed like that allowed me to slow the splitter down if the need arose.  It came through with everything except for the motor installed and in just over half an hour I had the motor on and was adding the oil and fuel.  The motor is a six and a half hp Honda that starts amazingly.  As well as the motor, I really love the wide pneumatic tires as they roll over things and are much more stable than the old splitter's narrow hard rubber tires. 


Sitting next to each other there is a huge difference.  The new one has a much wider and taller stance that will be easier to work with and the large working platform will make a world of difference. 
                                             Supersplitter First Time Starting and Running
Here it is.  The first startup and first time running.  I couldn't be happier with the speed and the splitting power that this splitter has.  Allyssia is also loving the splitter already and we both think it is miles ahead of our old one.  Be sure to check out the Supersplit website.
                                                            http://www.supersplit.com/
There are a lot of links strewn through this post so make sure to check them out.  Check back often and make sure to leave a comment!

Tuesday, March 13, 2018

A Long Time in The Works......

As everyone has obviously noted I haven't made a blog in quite some time now.  Life has been extremely hectic the last couple of weeks.  We have made some huge leaps in our life.
We bought a house!  We didn't buy just any old house, we bought a nice log cabin nestled on 13 acres of land in Farmington.  We are right on the edge of Wilson stream and it is almost all field around the amazing indoor riding arena and 9 stall horse barn.
We closed on the property on March 5th and that day I moved a few tractors and some shop stuff into the two car garage that has now become my shop.
The Garage is not insulated but to me anything with a roof is better than having to work out in the cold wearing a snowsuit and having to shovel around all of my projects.  After moving a bunch of tractors and equipment in Monday Allyssia and I went up to the house and decided that before moving in we needed to refloor the kitchen, dining room, and the hallway to the front door.
The flooring was a vinyl roll down flooring that was cracked and faded and peeling up in spots so we opted to go with a PVC core click together flooring.  It is completely waterproof and fairly well scratch resistant. 

My father came over and helped me get started on the floor as he has done multiple click together floors at his house and at my sister's.  When I first started there were a few times that I said "why did you start this" but once I got going it got easier and better.  I still have to finish putting trim around the floor but the floor is down so that is what matters.  Another improvement before moving in was a little bit of painting.  Allyssia painted the kitchen a nice light blue to cover up the yellow that was there. 
This is the first picture collage that I have used on the blog and I hope it shows the colors well enough to see the brightness change in the room.  Finally Friday came along and we started packing the horse trailer with furniture and boxes that night and into Saturday morning.  Saturday morning one of my co-workers came and helped me get the mattress and box spring as well as the couch onto the trailer.  When we arrived in Farmington my other co-worker arrived and helped with the mattress and box spring but not the couch.  We ended up getting rid of the old couch and went to Big Lots and instantly found the perfect couch for our living room.


It's a recliner couch and of course Cricket approves!  Now even though we were mostly moved in Saturday we still had work to do Sunday moving the horses, hay, round pen panels, and other supplies up.  We spent most of the morning and into the afternoon cleaning the stalls out setting up fences and just in general cleaning the barn that hasn't been used in years.  Around two o clock Allyssia left to get the first two horses and by six thirty they were all in stalls and eating happily.


Now onto the house again!  It is a beautiful two bedroom two bathroom log cabin with an unfinished basement and a loft. 


The house is absolutely gorgeous placed in the middle of a nice flat lawn not to far from the barn or the road.  There is no wood stove but there is oil heat and a pellet stove in the living room.


The previous owners also left us enough pellets to finish the winter out.  If you notice in a lot of the pictures Cricket steals the show looking extremely cute and posing for the picture.
So it has been a big step for us but we made it and this big of a step means many more projects to come.  I am going to do my best to document the before and after of all of these projects and most definitely post more often than this last spell that went by with nothing.  As usual stay tuned as we will be making improvements and starting projects left and right here and would like to bring you along for the ride!